Lego

Lego Ideas 40335 Rocket Ride! – Fan Designer

Lego Ideas 40335 Rocket Ride! – Fan Designer

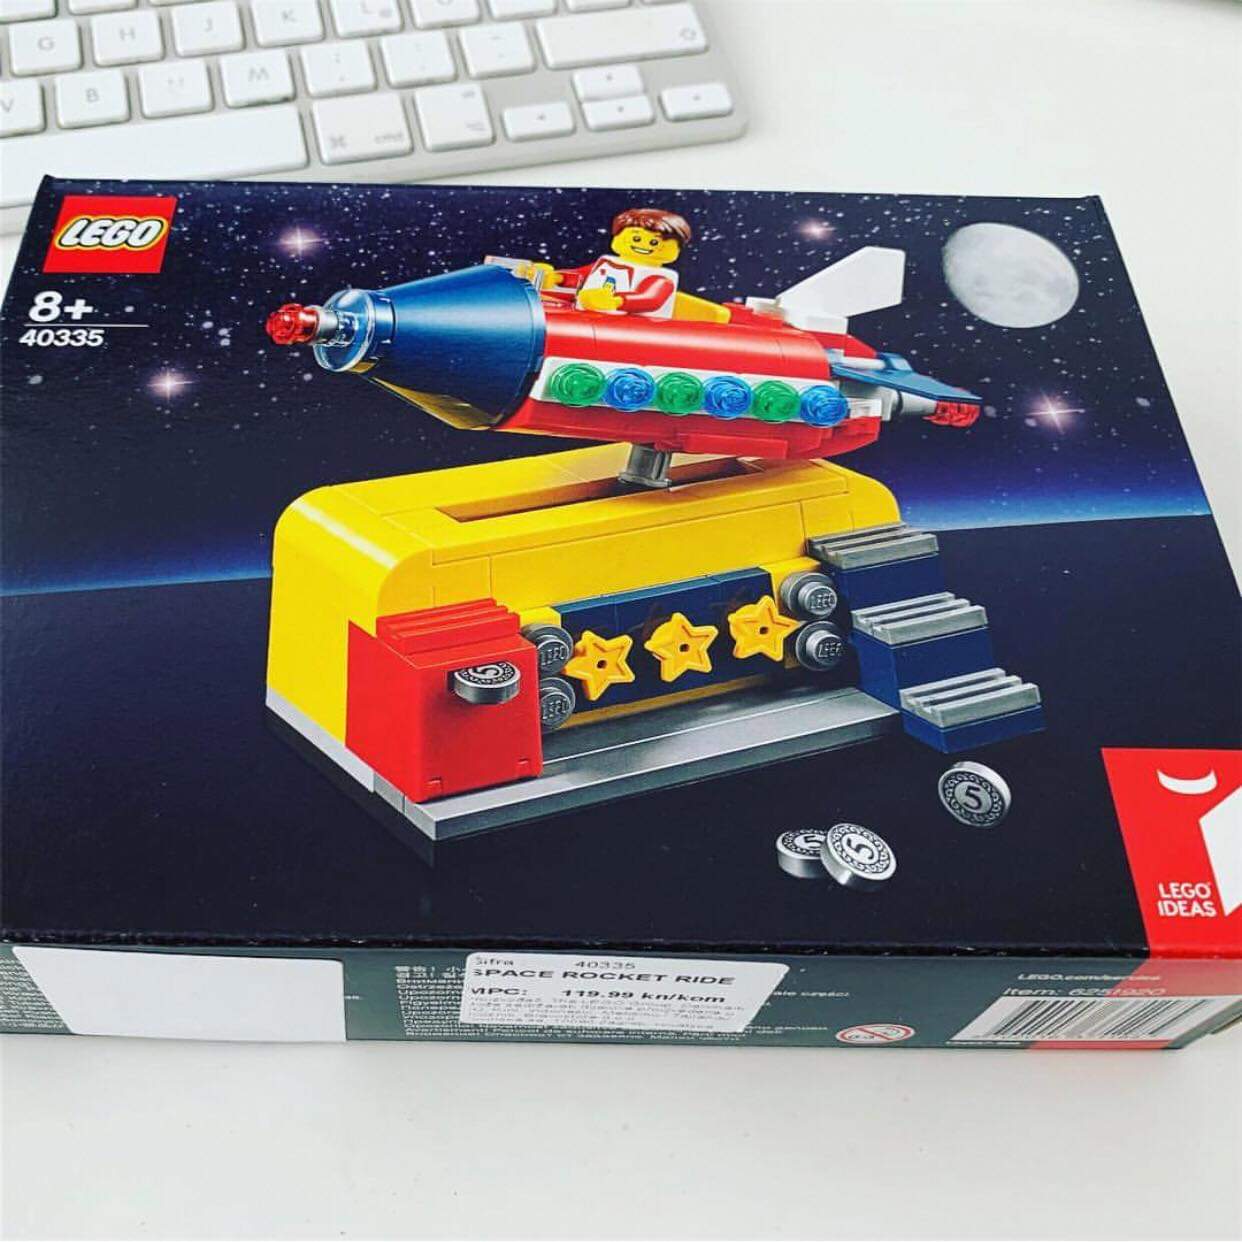
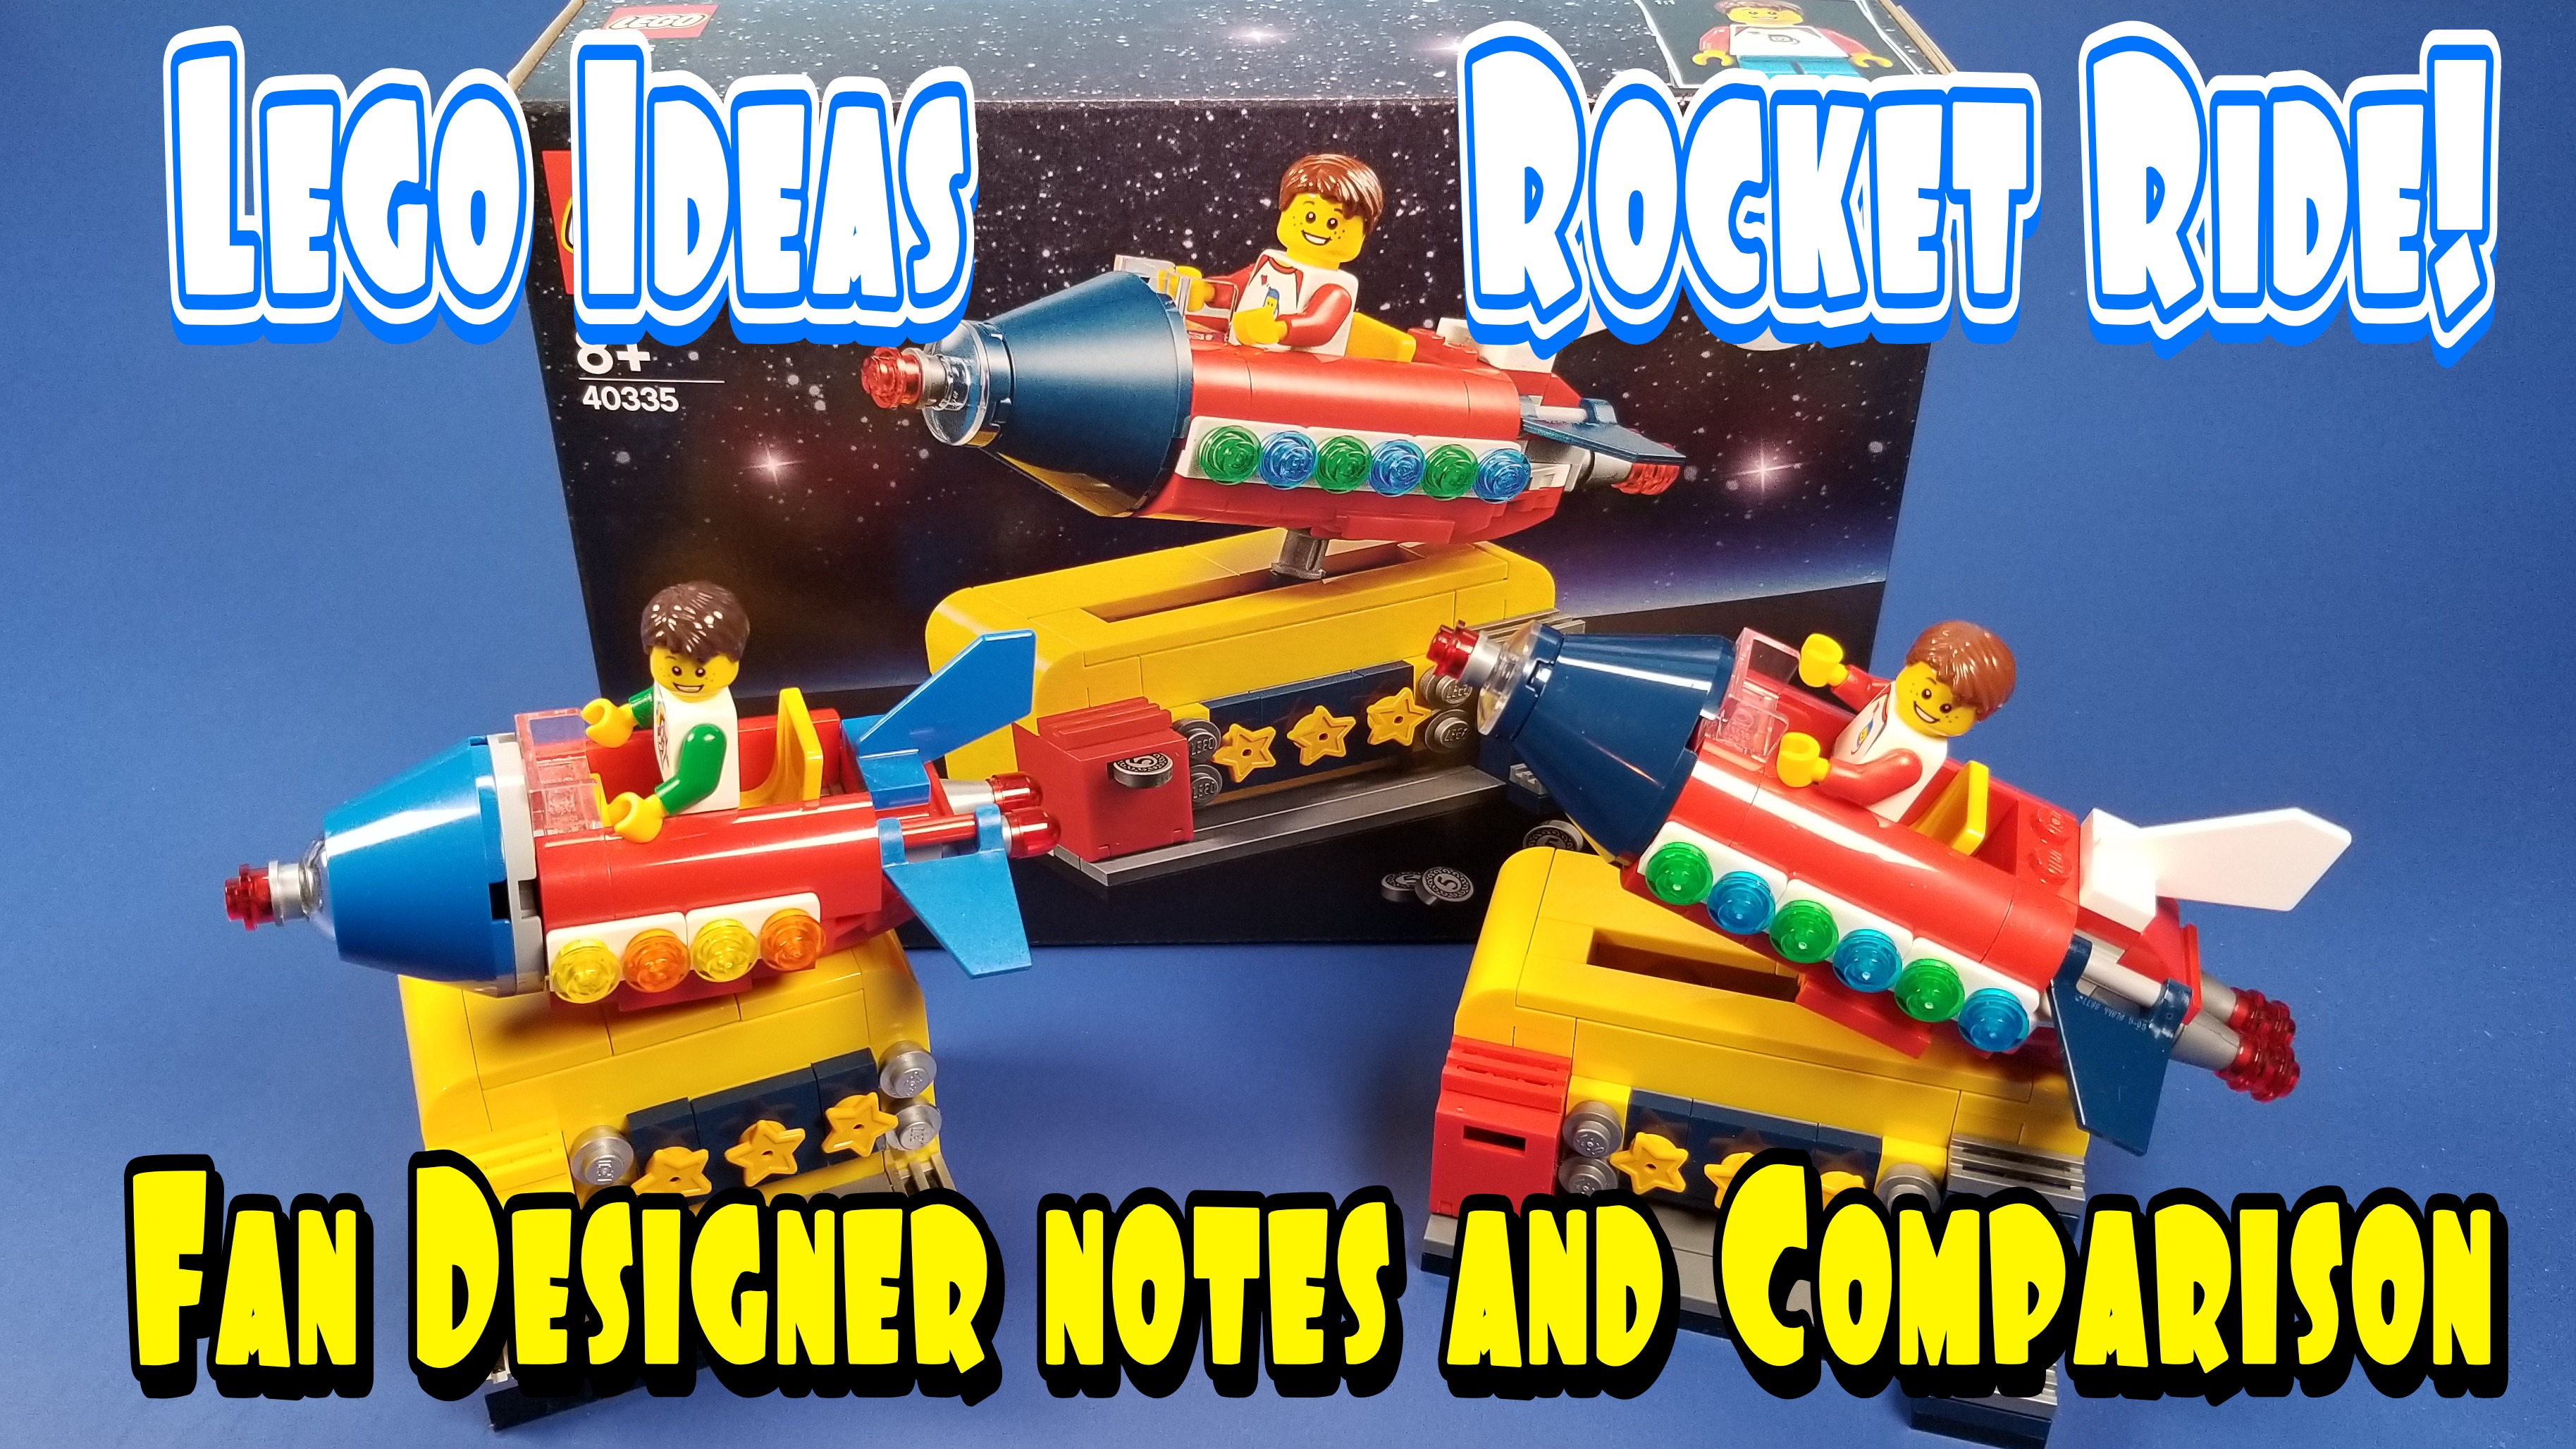
Well the big day is finally here.  I’ve been waiting quite a while for Lego to announce their version of my Cosmic Rocket Ride.  In the process of working with Lego on this little project, they asked me to make a little overview and comparison video.  So lets start with the comparison of my submitted fan design to the official final Lego design:

They edited it down and used it for a little Facebook post which has been well received with predominately nice comments.

The little rocket ride is already showing up on Ebay and being listed for $75 to $99 even though its just a 154 piece set.

A Bit of the Behind the Scenes:
Lego hosted a small contest on their ideas site called “Moments in Space.”  One of the stipulations was that your entry could require no Lego parts in colors that have not already been made.  What I learned during the process, was that they actually wanted to make the final design using only parts that were currently in their inventory (so no customs whatsoever).  That tidbit right there was the prevailing reason the design’s colors were altered in so many places.  I think the simplicity of my designs color scheme was possibly a benefit in it winning that contest with those particular set of rules…that and it did end up getting the most fan votes, but they had indicated at the start that they had the liberty to choose from the top 5 or so fan voted entries.

After I submitted my entry, I did make a few tweaks, particularly to the gizmo inside that makes it move.  Lego made further modifications to that design.  One key update they made resulted in the motion being slightly larger but also a bit asymmetrical.  Lego made one of the technic pins a friction pin so that the ride could be left frozen in a “pose”.  This was a good idea, it makes the motion smoother, but harder to perform.  They made the design a little longer too, as you can see they added stairs, a step, and elongated the rocket by 2 studs.

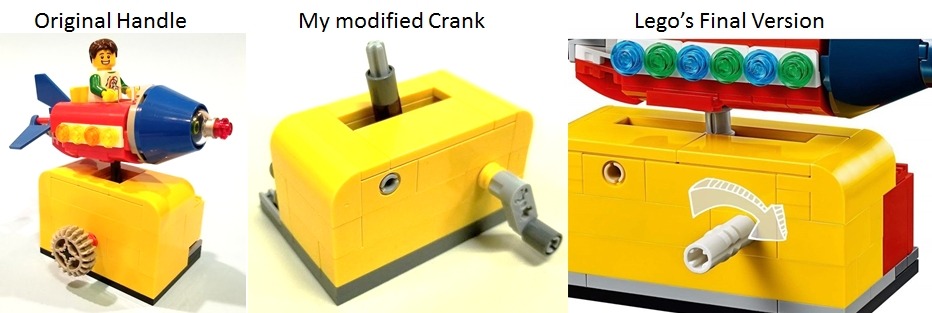
The biggest concession was the handle for the crank.  By the time Lego requested extra photos of my design, I had changed my crank handle from a gear to a really nice arm with rotating handle.  Its smooth and a gives a nice crank.  The final version was reduced to a twisty stick.  It works, it has grip, but its not quite the buttery smooth crank I had.  Their version does seem to be primed and ready for motorization if someone wanted.


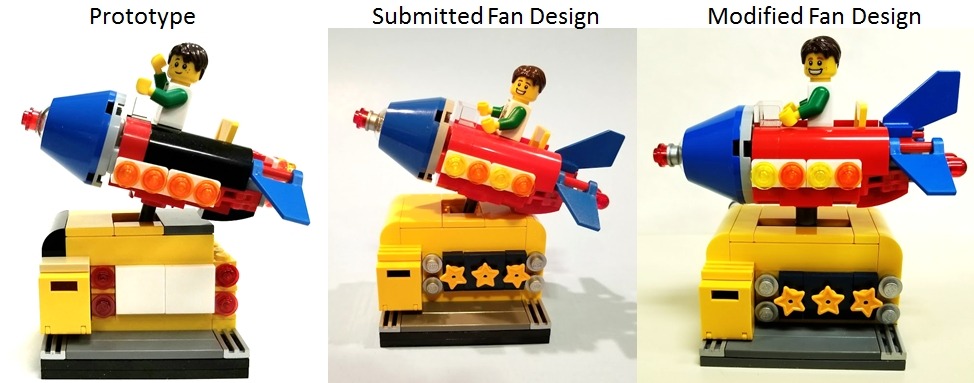
Evolution of my design: My design went through a few stages including an initial prototype, the submitted version, and some further tweaking:


Make your own: If you weren’t lucky enough to get a free one from Lego during the promotion, here are my directions to make your own.  This is my version with updated movement, but my original body and base design.  If you make one, let me know in comments and share some pics!  Best of Luck!

Link to the Bricklink Stud.io page which will show you part lists, the rendered version, and instructions.

Well, its a little piece of wonderful to have my little rocket ride turned into an official Lego set.  It is such a high honour and I’m very pleased.  I hope the little rocket ride is well received and am thrilled to have been involved!


Posted by Farquar in Lego, Promoted, 2 comments
Adventure Baby Squad

Adventure Baby Squad

Adventure Baby Squad is an elite team of babies that are ready to charge into the world and help at a moment’s notice! They are fully equipped with big hearts, small rides, and an expanding headquarters. With their tiny pocket-sized rides, the fun doesn’t have to stay at home – bring one with you on away missions, in the car, or out on the town.

See the Adventure Baby Squad in action in their epic rescue mission!

The Adventure Baby Squad is a proposed Lego set entered into the Lego Ideas Contest.  You can support the idea and see more pictures over at the Ideas Entry!

Meet the Squad
Known only by the colors they wear the team is comprised of:

  • Violet (Team Leader) drives the Confetti Launcher – Shirt design: Dinosaur
  • Pink (Reconnaissance) flies the Sci-Fi Spaceship – Shirt design: Butterfly
  • Yellow (Mechanic) flies the Space Shuttle – Shirt design: Duck
  • Green (Chef) drives the Tricycle – Shirt design: Turtle
  • Blue (Tech) flies the Prop Plane – Shirt design: Elephant
  • Teal (Secret Agent) pilots the Submarine – Shirt design: Dolphin

The Vehicles and Robot
The babies all drive their own different craft which give them command of the land, sea, sky, and space! In certain tricky situations, the vehicles can be linked together to form a robot with a multitude of configurations. With multiple options for the head, arms, and the option for a jet pack, wings, or both, the robot can be tailored to your liking.

Headquarters
The headquarters build is a bit more complex than it may seem. The front sections slide out to reveal the lido deck -a hidden pool that connects underground to a local river system and used for the submarine dock. The plank in the back center can then slide out over the pool to create a platform for the robot to be displayed, maintained, or modified by the squad.
Other features include:

  • Parking for all vehicles – trike and plane can be hung up on the side supports
  • Conference Room – complete with custom modern art blueprints
  • Kitchenette – stocked with fridge, stove, sink, and plenty of extra bottles
  • Mechanic’s Bay – with tools and essentials
  • Command Center – features a sophisticated computer and communications desk
  • Fold down ramp in the back
  • Two landing pads
  • Storage slips for the robots arm extensions
  • Compact design for shelf space or expansion for display!

Included
This proposed Lego set would include everything you need to go on adventures of your own:

  • 6 Babies in 6 colors with prints on each
  • 6 Pocket-sized vehicles ready for land, air, and sea
  • 1 Headquarters main build with slide outs and all the amenities a team could want
  • Ability to create a multi-configurable robot!
  • Custom tiles with modern art and blueprints
  • 4 colored arm extenders for the robot
  • Excitement and a glorious sense of Adventure!

Help this Idea become a full on Lego Set by free supporting it at Lego Ideas!

Posted by Farquar in Lego, Promoted, 0 comments
Cosmic Rocket Ride Promotional set found in Croatia

Cosmic Rocket Ride Promotional set found in Croatia

The winning set from the Ideas Contest “Moments in Space” is said to be getting turned into a promotional free with purchase set with details of it’s release and promotion still not revealed. The set has recently turned up however, in Croatia in this one snap shot.

The box art doesn’t have all the usual words and numbers on the left but it seems the set number will be 40335 and it will have the Ideas tag but may or may not have an official ideas set number.

The original submission looked like this:

So there have been some small updates:

The official one is:

  • Wider by 2 studs
  • Has a red mail box not yellow
  • Uses dark blue rather than regular blue
  • Has stairs
  • Has blue and white fins
  • The nose cone was redesigned
  • Side lights are blue and green rather than yellow and orange
  • The Minifigs are different

Well since this was my submission, I am rather excited and surprised to see it start to trickle out into the public eye. I can only hope that it is well received by the world’s Lego fans.

Posted by Farquar in Lego, 2 comments
Release the Kraken!

Release the Kraken!

This comically tiny EPIC battle between the mighty Kraken and an unfortunate vessel comes to life by turning the crank. This and several other alternate themes are meant to serve as inspiration for what a Lego fan could do with the Lego Ideas’s proposed set: Clockwork Aquarium. Please free support/vote for this idea at: https://ideas.lego.com/projects/fa8f5… If it gets to 10K supporters/voters, Lego may turn it into a real Lego Set and then you too will be able to Release the Kraken!!

This variation features:

  • A Sweet Mini Kraken – this took me quite a few iterations and I’m really happy with how this tentacled, spooky-eyed, sharp-beaked “monster” came out.
  • Micro Ship – this also took a lot of tinkering to develop as I needed it to be both small and detailed.  The canons on one side and windows on the other were a last minute addition!
  • Underwater and above views – I added clear blue windows under the normal clear windows to create an underwater and above water look.  There are plants, the majority of the Kraken’s body, and even a crab down below, and the ship, kraken’s tentacles and beak, cloud, and mountains above water.
  • I also developed a new way to hold the poles to the mechanism down in the cabinet.  This made it so their was no extra length of pole sticking up above the fish and the boat!

I hope you like this theme and please do support the Clockework Aquarium!

Check out the original video here:

Continue reading →

Posted by Farquar in Lego, 0 comments
How to get Lego R2D2’s head to spin

How to get Lego R2D2’s head to spin

Lego has been making R2D2 in minifig form along with his cousin’s for years now.  And to this day they still don’t make a version where the Droid’s head can pivot.  Since this is a classic feature of R2D2, and in part lend’s the the astromech’s emotive quality, I really wanted the Lego Minifigure to be able to turn its head.  This is the second method I’ve come up with, and like the first, requires modifying Lego parts.  So no, its not “legal” build, but you’ll never get the minifigure’s head to spin if you don’t think outside the box.

Essentially, I replaced the top 4 studs of the R2 body with just 1 central Stud.  It works great.  In this video, you’ll see my dremel wielding Methodology at work.

Posted by Farquar in Lego, 0 comments
Harvesting and Transplanting Studs to the Lego Food Tray

Harvesting and Transplanting Studs to the Lego Food Tray

The Series 17 Collectible Minifigure Hot Dog Man came with a drink, hotdog with bun, and a new blue tray to rest the food on.  The only problem was the tray was smooth on top and any food or option would easily fall off.  Its been a desire of mine since seeing this tray to add 2 studs to it and I finally did it.

The whole process can be seen in the video, but in brief I:

  1. Harvested 2 studs: Sanded, Grinded, and Sanded a 1×2 Plate down till there was nothing left but the protruding part of the studs.
  2. Transplant: Put the freed up studs into a helper plate and glued them to the tray.
  3. Rejoiced!

Continue reading →

Posted by Farquar in Lego, 0 comments
How to make a Lego Pinball Flipper

How to make a Lego Pinball Flipper

The Lego Handheld Arcade was an idea I posted to Lego Ideas quite a bit ago.  It got some good support at first but then ultimately fizzled.  To this day, I still get requests to show how the flipper mechanism works.  So I have finally created a video with a step by step on how to create the Pinball flipper mechanism I originally made for the Lego Handheld Arcade.

A couple quick notes:

  • I am working to resubmit an upgraded version of the Lego Handheld Arcade to Lego Ideas in the next month.
  • Do consider supporting my other project: The Clockwork Aquarium

With out further ado, the tutorial:

Continue reading →

Posted by Farquar in Lego, 0 comments
Lego Hogwarts 16×16 Minifigure Display Castle

Lego Hogwarts 16×16 Minifigure Display Castle

When you want every Lego set and every Minifigure, you quickly run out of shelf space. The new series of Harry Potter sets which include two substantial Hogwarts castles in both mini and nano fig scales, are both highly desirable and have some great figs. Unfortunately, I personally, just don’t have the space nor the money for these two beauties.

I am on a mission to display my minifigs in various scenic displays of various genres. For Harry Potter and Fantastic Beasts, a nice 16×16 Mini Hogwarts was a clear choice. Here you can see my final result which displays 17 Minifigures and 6 animals in the front and 4 minifigs and several accessories in the back.

In the back you can see how I mounted the flying Malfoy with a rather articulate arm which makes a lot of great posing angles possible.

Normally my 16×16 displays are pure facades without much detail in the back, but I made an exception with Hogwarts. I added the floating candles, storage for potions, a culdron, and the sorting hat in the back and placed 4 figs back there essentially in storage. Under the castle is a catacomb area which features the full body wizards chess and flying keys from the Sorcerer’s Stone.

Here is a brief video tour with a bit more commentary:

I sourced a lot of the parts and figures on Bricklink for far less than the main Great Hall set and for significantly less scratch than the 4 combined sets it takes to get all these figs.

Here are some pictures of the castle without the figs:

All in all, I am thrilled with how this 16×16 display came out and look forward to sharing and making more of them.

Virtual version

Here is a Stud.io version of the main castle build: Link to Bricklink Entry


Posted by Farquar in Lego, 11 comments
Escape Pod for the Microfighter Millennium Falcon sets!

Escape Pod for the Microfighter Millennium Falcon sets!

If you have a Lego Microfighter Millennium Falcon, you can easily add an escape pod in the style seen in the movie Solo with just a few spare parts and without modifying the original set at all! Here is a video demonstration:

Posted by Farquar in Lego, 0 comments
Escape Pod addition for the Lego  Force Awakens Millennium Falcon

Escape Pod addition for the Lego Force Awakens Millennium Falcon

Lego has produced quite a few variations of the famous Star Wars Corellian YT-1300f light freighter, the Millennium Falcon. Some have ranged from $4 up to $800! Not too long ago, Lego set 75105 came out with the Force Awakens movie in 2015, and now for 2018, the Kessel Run version has come out. The Key differences are the Kessel Run set is shiny and new, white and blue, and has a strange shuttle/pod that gives its nose a long triangular sleek look. It feels like a “Phantom Menace” type of ship to me. The front shuttle/pod has never been part of the Millennium Falcon lore and was not portrayed even in the Prequel’s easter eggs. Most people, including me, probably don’t relate much to this front appendage as it just doesn’t resemble the Millennium Falcon they grew up with, but I’m starting to come around. Prior to seeing the movie, I’m expecting this to be a swanky custom add on for the freighter, much like how you can buy a tent to attach to the rear of end of some SUVs. So not so much a standard option but more so a deluxe and perhaps after market upgrade.

Either way, that Shuttle/Escape pod seemed interesting to me, but I have no interest in spending 170$ on another Millennium Falcon set. So instead, I set out to build my own pod for the Force Awakens set. I didn’t want to modify the original Lego model at all for this shuttle and succeeded in that goal. The Force Awaken’s Falcon has 2 rows of rails inside its notch which makes for a perfect attachment point for a shuttle.

I did some off-color prototype work and then ordered most of the parts from bricklink for under 16$ with shipping. With my Escape Pod/Shuttle slid in, the set came out looking quite nice!

Animated Gifs:


Here you’ll find a Video tutorial of how I built my Escape Pod and Parts list.

Tutorial Video:

Continue reading →

Posted by Farquar in Lego, Promoted, 23 comments